This article explains the manual upgrade process for Socket sites.
Overview
Cato manages the Socket firmware upgrades and version control for Socket sites to make sure that they are running up-to-date versions. Major Socket versions are usually released quarterly. For more information, see Understanding Cato's Managed Socket Upgrade Service.
There are some scenarios where a Socket skipped an upgrade, for example, the Socket was not connected to the Cato Cloud during the maintenance window. When this happens, you will see a notification in the Cato Management Application, and you'll receive an email that the upgrade was skipped.
If that happens, you have the option to upgrade the Socket manually.
Note:
If the Socket is already running the latest version, the Upgrade option is greyed out.
Upgrading Sockets
This section explains how to perform manual Socket upgrades. These are the upgrade options:
Upgrade a single Socket - For example, if a specific Socket failed to automatically upgrade during the Maintenance Window
Bulk upgrade - For example, if your organization paused automatically upgrading Sockets for stability reasons and now multiple Sockets in the account are running old versions
Upgrading a Single Socket
This section explains how to perform a manual upgrade of a single Socket.
Cato recommends as a best practice to upgrade to the latest Socket version
The upgrade process takes approximately 20 minutes, and downtime is approximately 2 minutes. If you have any issues when upgrading, refer to this Socket upgrade troubleshooting article.
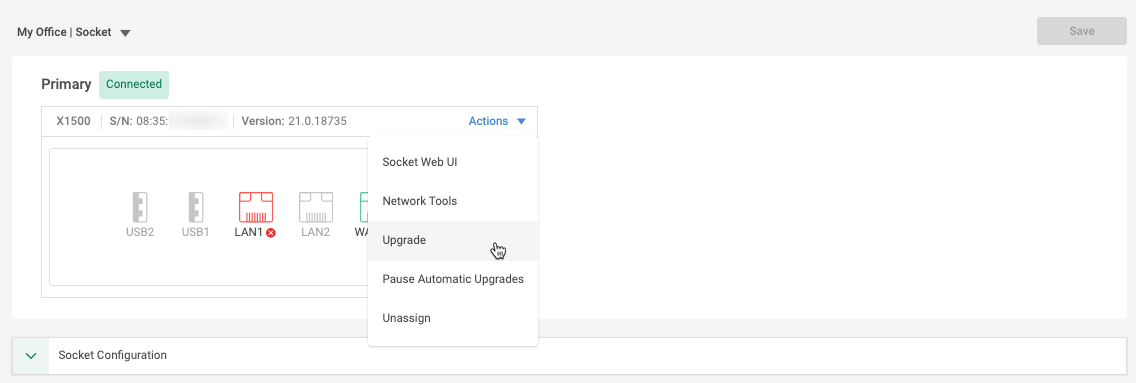
To manually upgrade the Socket:
From the navigation menu, select Network > Sites, and select the site.
From the navigation menu, select Site Configuration > Socket.
Click Actions > Upgrade.
If there is already an upgrade in progress for this Socket, the Upgrade menu option is greyed out.
Select the version to which to upgrade.
Click Upgrade.
Bulk Upgrading Sockets
You can bulk upgrade Socket sites with the same connection type. For example, upgrade all the vSocket Azure sites. By default, all the selected sites are upgraded to the latest Socket version. However, you can also choose to upgrade to a different version. Up to 100 Sockets can be upgraded at the same time.
You can perform bulk upgrades immediately, or schedule them to automatically run in a planned maintenance window up to 30 days in advance. When you perform an immediate upgrade, all selected sites upgrade at the same time. When you schedule an upgrade, each Socket site upgrades according to its configured time zone.
Notes:
A scheduled upgrade can only be canceled by entering each Socket's management page (Site Configuration > Socket) and canceling the upgrade for each individual scheduled Socket. See below, Canceling a Scheduled Upgrade.
If you select sites with different connection types, the Upgrade option is greyed out.
Bulk upgrades do not support downgrading to a lower version. For example, if you select to bulk upgrade a site with v21 and another with v22, you can only upgrade to v23 or higher.
When an HA site is selected, the upgrade will start with the primary Socket, to allow a failover to occur. Then, after it successfully upgrades, the service automatically initiates the upgrade for the secondary Sockets.
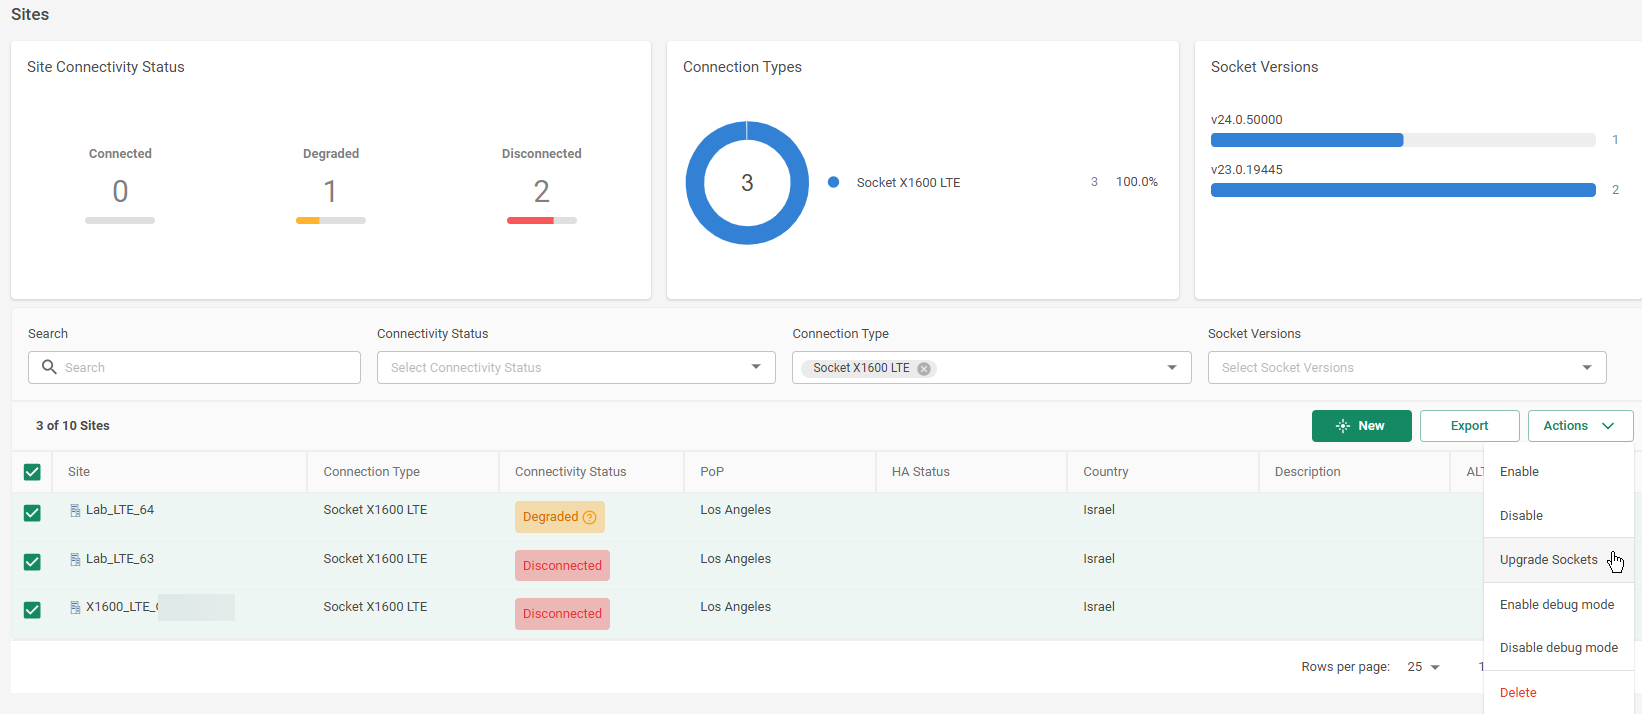
To bulk upgrade multiple Socket sites:
From the navigation menu, select Network > Sites.
Filter the page for the sites to be upgraded, and select the sites.
Click Actions > Upgrade Sockets.
Select the version to which to upgrade.
Under Upgrade time, select Immediate or Custom.
If you select Custom, use the Custom time section to schedule a time.
Each site is upgraded according to its configured time zone.
Click Upgrade Sockets.
Note: The Upgrade Sockets option is greyed out if one of the following is true:
None of the selected sites are connected
All the selected sites already run the latest version
There is already an upgrade in progress for these sites Socket, the Upgrade menu option is greyed out
Canceling a Scheduled Upgrade
A scheduled upgrade can only be canceled by entering each Socket's management page and canceling the upgrade for each individual scheduled Socket.
To cancel a scheduled upgrade:
From the navigation menu, click Network > Sites, and select the site with the Socket scheduled for upgrade.
From the navigation menu, click Site Configuration > Socket.
From the Actions menu for the relevant Socket, select Cancel Manual Upgrade.
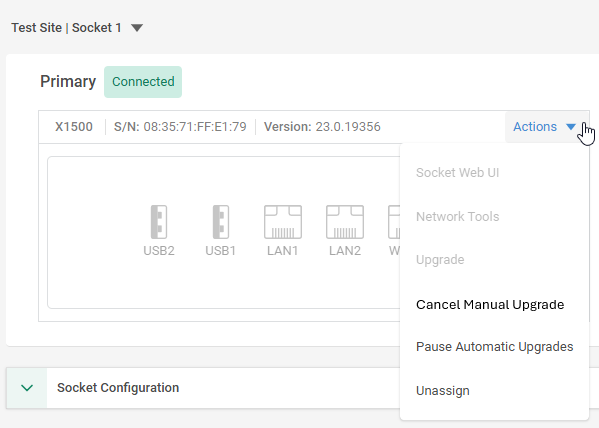
In the confirmation dialog, click Cancel Upgrades. The scheduled upgrade is canceled for this Socket.
Repeat steps 1-4 for each relevant Socket.
Best Practices for Bulk Upgrading
If you're upgrading many Sockets, begin with a few Sockets to verify the process works as expected, and then continue with larger groups.
Use the filters on the Sites page to make it easier to select relevant sites for the bulk upgrade. For example, filter for sites with the same connection type and version, and select them all with the checkbox at the top of the sites table.
Use the site Description field to add relevant tags that are displayed on the Sites page. This can make it easier to find relevant sites for upgrading.
Manually Upgrading for HA Deployments
For HA deployments, Cato recommends that you first upgrade the primary Socket, which triggers a failover to the secondary Socket. The primary Socket completes the upgrade, including the downtime, and after approximately 20 minutes, you will receive an email notification that the upgrade was successful and the primary Socket is upgraded and stable. As soon as the Primary Socket comes back online, it takes back the Primary Socket status.
At that point, you can upgrade the secondary Socket. After approximately 20 minutes, you will receive an email notification that the upgrade was successful and the HA status should be Up.
Note:
The upgrade process takes approximately 20 minutes, and downtime is a few seconds (depending on how long it takes for the VRRP to notify the secondary Socket). When using BGP, the time for BGP failover and routes to be refreshed is dependent on the BGP configuration.
If you have any issues when upgrading, refer to this Socket upgrade troubleshooting article.
Pause Automatic Upgrades
Cato automatically upgrades Sockets as part of the Managed Socket Upgrade Service. However, in some scenarios, you might want to skip an upgrade to avoid any potential downtime. For example, if you have a business-critical site around the holiday season, to avoid taking the site down for any period of time, you want to opt out of the automatic upgrades.
To pause automatic upgrades for a site:
From the navigation menu, click Network > Sites, and select the site with the Socket whose upgrades you are pausing.
From the navigation menu, click Site Configuration > Socket.
From the Actions menu of the site, select Pause Automatic Upgrades.
A warning window opens.
Click OK.
Cato recommends that you resume automatic upgrades as soon as your business needs allow for it to ensure that your Sockets are kept up-to-date.
Manually Rolling Back a Socket Upgrade
If you experience issues after a Socket upgrade, you can use the Cato Management Application to roll back the Socket to the version it was running before its most recent completed upgrade.
The rollback target is determined automatically and can be an earlier major or minor version. You cannot select a different target version. If the upgrade included intermediate versions, rollback returns to the version running before the upgrade began.
You can manually roll back a Socket within 14 days of its most recent successful upgrade. If you need to roll back after this period, contact Support.
After a completed rollback, the Socket must be upgraded again before you can perform another rollback.
Note:
Rolling back can impact features that require a newer Socket version. These features might stop working or behave unexpectedly after the rollback.
Prerequisites
Rolling back upgrades is supported for Sockets that ran Socket v25 or higher before the upgrade that is being rolled back. Meaning, the target version cannot be lower than Socket v25.
The Socket must be connected to the Cato Cloud.
Rolling Back Socket Sites
Use the Sites page to roll back the Sockets at one or more sites. For HA sites, the primary Socket rolls back first. The secondary Socket rolls back automatically only after the primary Socket successfully completes the rollback. The primary and secondary Sockets can have different rollback targets, and each Socket returns to its own previous version.
Use the Rollback Target Version column to review the version the Socket will be rolled back to.
You can also use the Socket page to roll back an individual Socket.
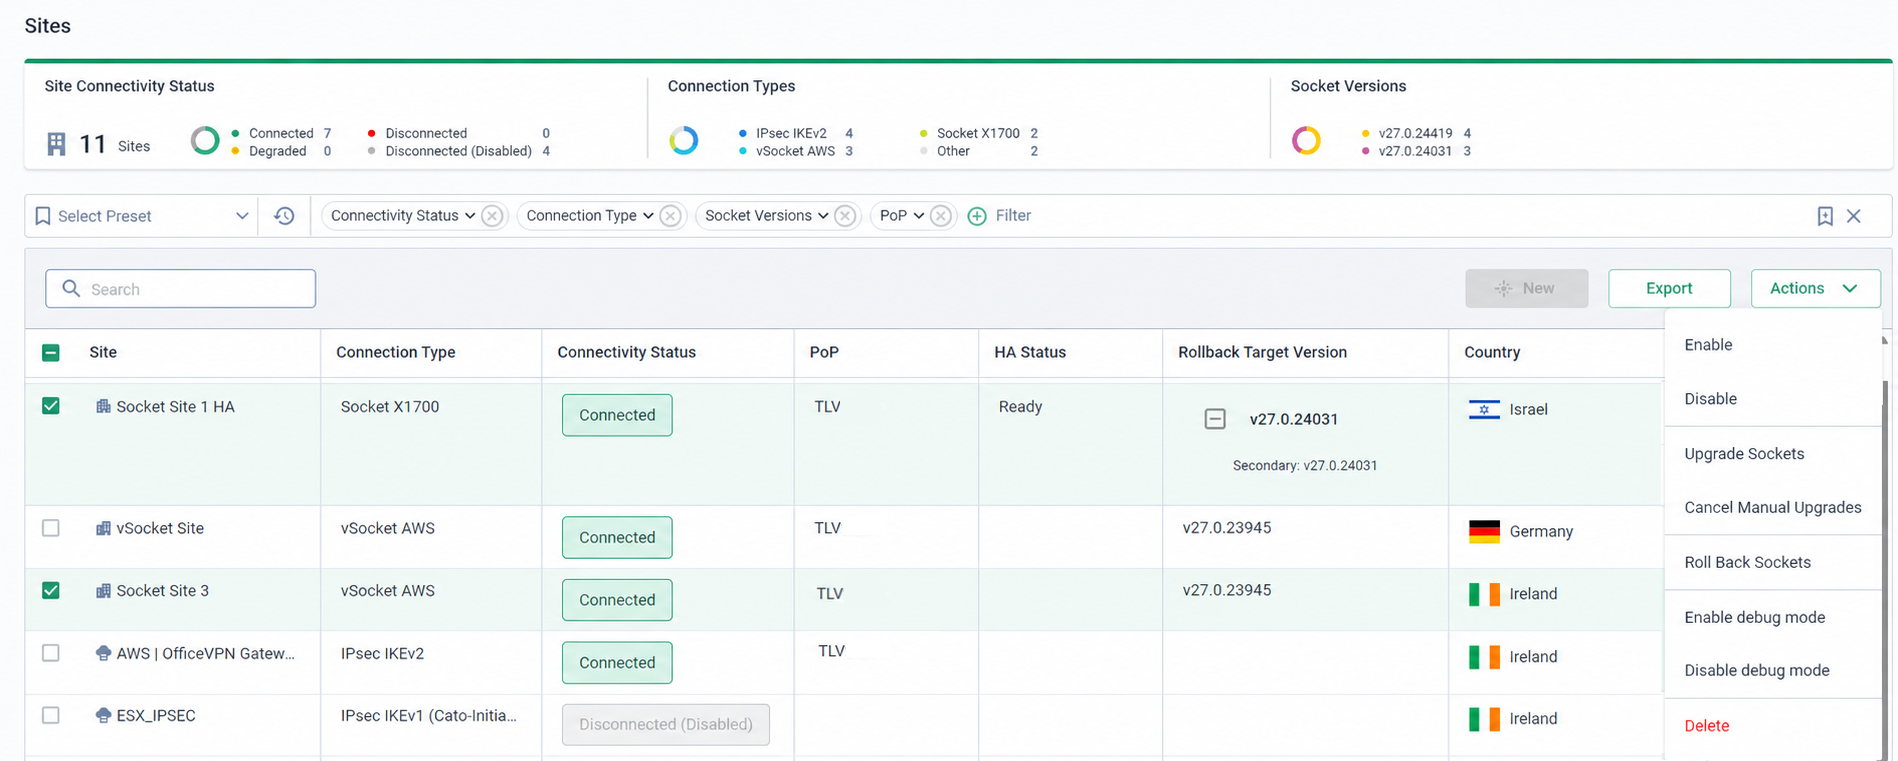
To manually roll back Socket sites:
From the navigation menu, select Network > Sites.
Select the checkbox for each site whose Sockets you want to roll back.
Click Actions > Roll Back Sockets. The Roll Back Sockets panel opens.
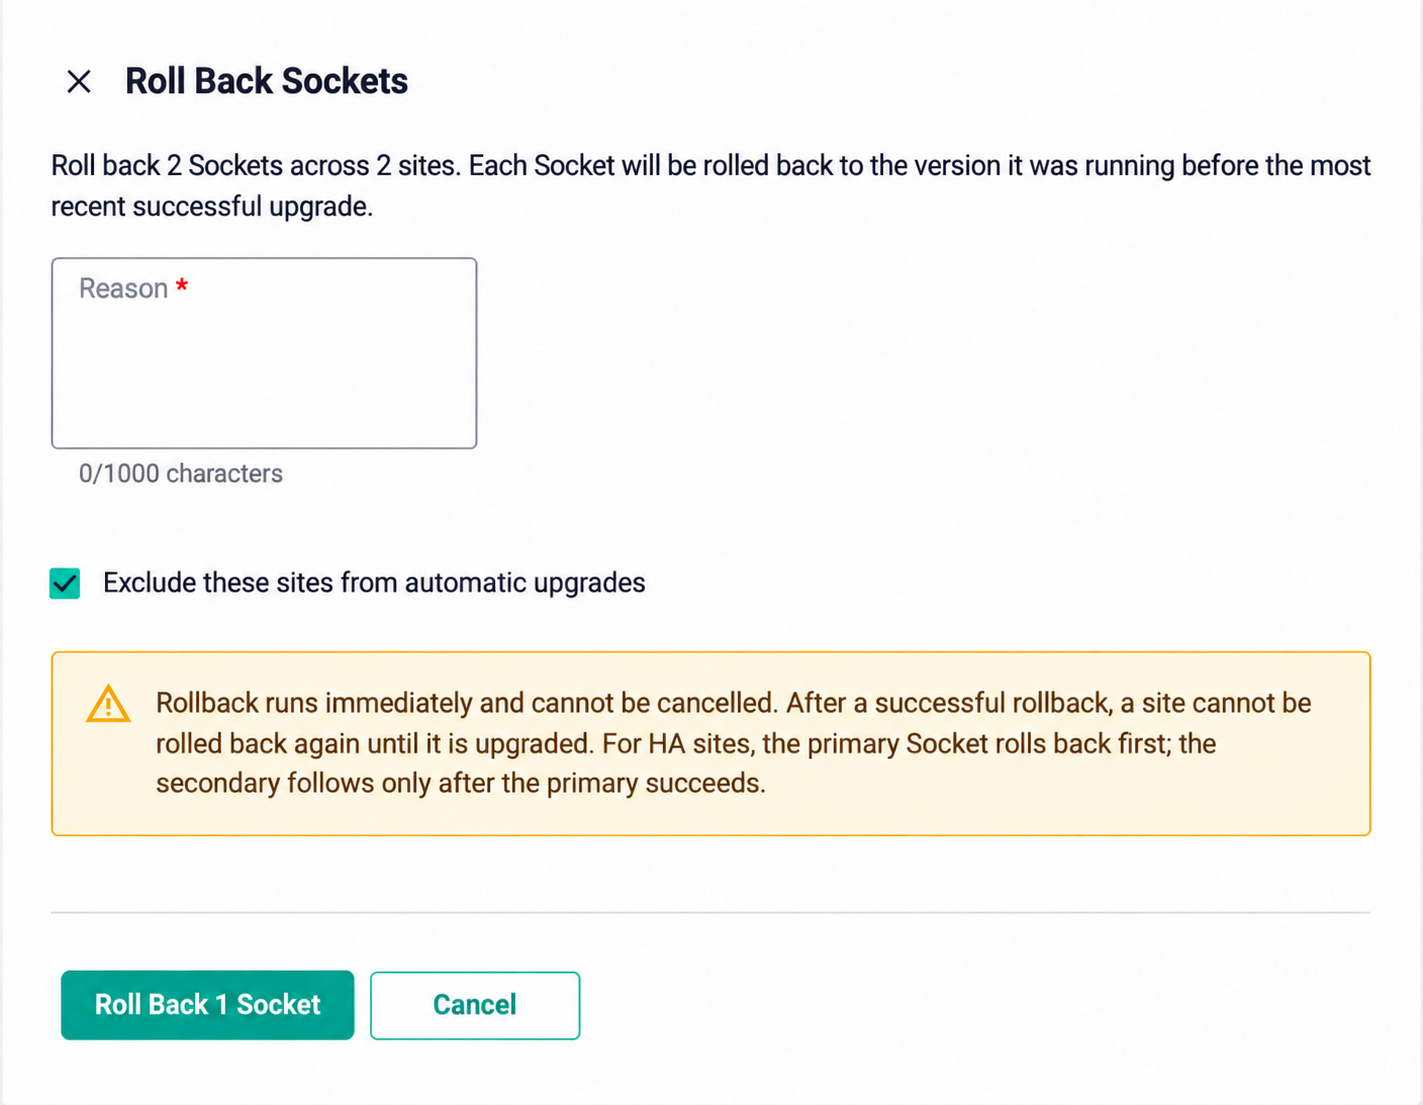
In Reason, enter the reason for the rollback.
By default, Exclude these sites from automatic upgrades is selected to pause automatic upgrades for the selected sites. Clear the checkbox if you want automatic upgrades to remain enabled.
Click the Roll Back button, which also shows the number of Sockets to be rolled back.
Note: If any selected Socket is disconnected or outside the 14-day rollback window, this button is greyed out. Adjust the selection to include only eligible sites.